Monday, January 22, 2007

WWII PACIFIC WAR
Imperial Japanese Army

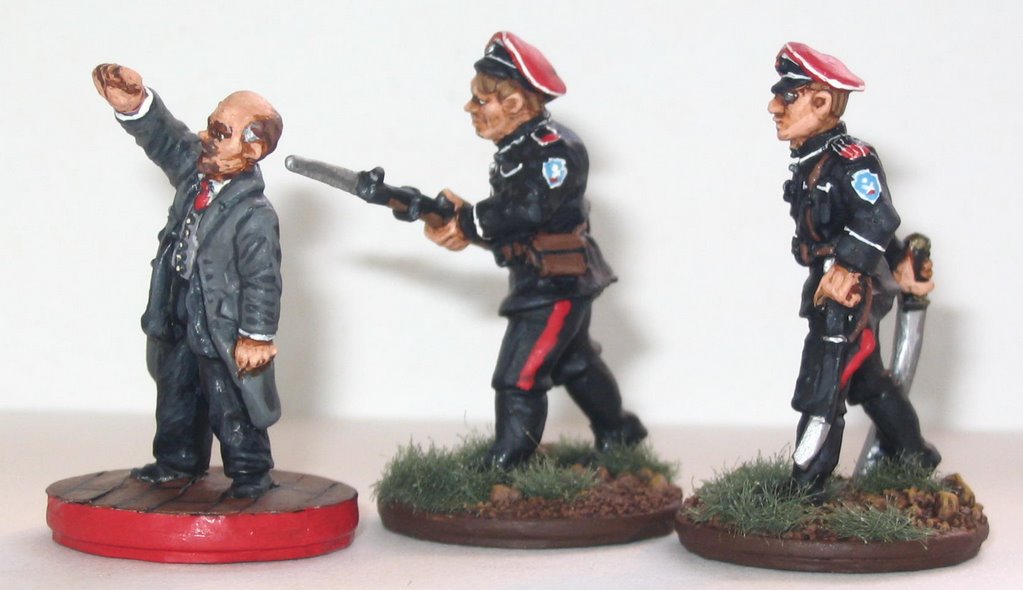
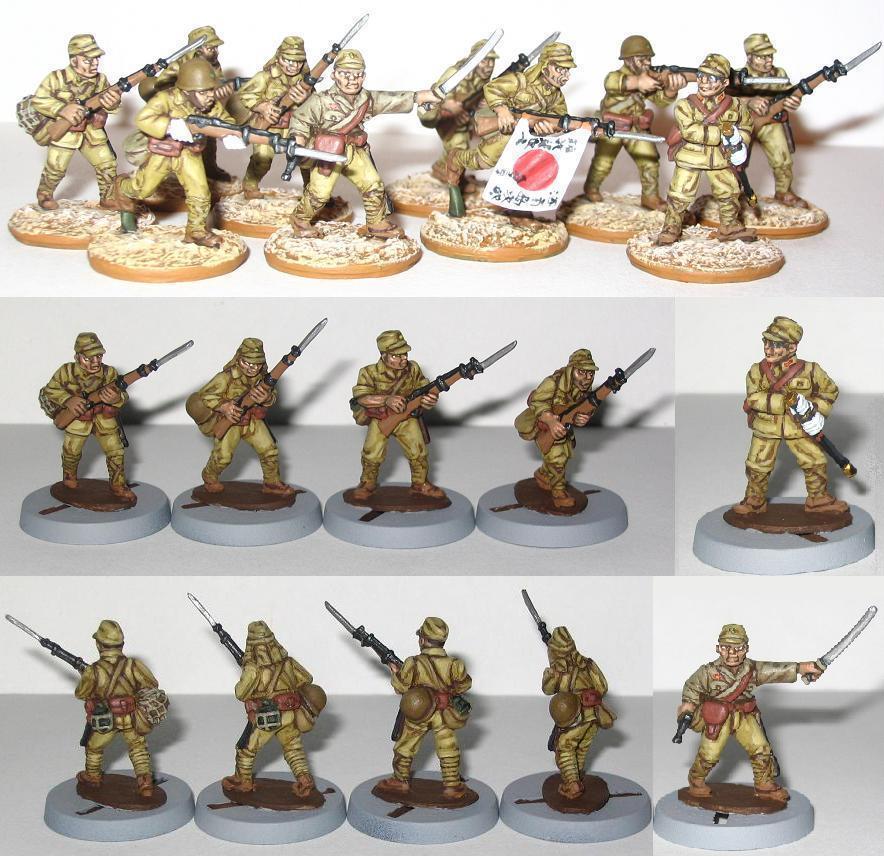
With the recently release of “Letters from Iwo Jima” I knew I had to add something from that period to show here. PacWar WWII, available from Brigade Games, makes an outstanding line of USMC and Japanese infantry initially seen in Issue #6. There are four sets of Japanese infantry packs (A-D) with two packs wearing helmets and the other two with soft hats. There is a command pack and LMG pack (LMG and three supporting crew as per the normal Japanese platoon OOB.) The Command pack has 6 assorted Officers/NCOs complete with samurai sword. The Infantry come 4 to a pack with soft hats and a mix of hat flaps and measure 25mm to their eyes; the Japanese soldier of WWII is shorter than his American counterpart and the figures demonstrate this difference very appropriately. The figures in the packs are very well proportioned and uniquely posed with plenty of realistic action. All of the figures were well cast with little flash and were easily and quickly prepared for painting. The IJA figures come with a varied array of field gear so that all of the figures completed to date are unique (one even has camouflage netting on his helmet, a very nice touch) and the detail/quality remains high.
While the Command and infantry wearing helmets are great, there is just something awesome about the figures wearing the cap flaps (2 in each pack.) The IJA infantry figs with the hat flaps fall into my “gotta have them ‘cause they’re too cool” category (like Vendel’s March Warden figures - reviewed in issue #7 of the HMG magazine.) There is just something that “strikes” me about these figures – the action in the figures combined with the way the flaps look on the hats makes me want to build coconut log defenses, assemble palm trees and game the WWII Pacific theater. They really look that good!
These figures represent the next phase in an ongoing project to produce figures and vehicles to replay the Pacific War campaigns. Support weapons are available as well as an artillery piece with the crew pending (I saw prototypes that are shirtless and look sharp!) There are plans to produce specialty figures every quarter – a John Wayne/Sands of Iwo Jima figure and a grizzled USMC sergeant with his stogie to name just two.
http://www.brigadegames.com/
(note: The figure with the flag does not come that way and was convertered by adding a piece of aluminum soda can folded to look like a flag. The written Japanese is taken from the Osprey MAA 432 Japanese Special Naval Landing Forces.)

Friday, January 19, 2007

WWII AIRPLANES
Luftwaffe 1946
Arado 555-1 Amerika Bomber (GE-055)
In early 1944 Arado was asked to design a long-range jet bomber with the following requirements: high speed, a bomb load of at least 4000 kg (8818 lbs) and a range of 5000 km (3107 miles). The flying wing design seemed to offer the best opportunity to fulfill the design specs powered by six jet engines. The defensive armament included two 30mm cannon in the wing roots near the cockpit, a remote controlled turret armed with two 20mm cannon located just behind the cockpit and a further two 20mm cannon in a remote controlled tail turret. In December 1944, Arado was ordered to cease all work on the bomber and to concentrate aircraft development and production of fighters, likely due to the worsening air war over the Reich. In the Luftwaffe 1946 storyline, this is the plane that delivers a nuclear device to New Your City (again, plausible, as the distance from Paris to New York is about 3600 miles!)
This model comes in 4 different pieces – the fuselage/wings, the 2 vertical tail sections and the 6 dorsal jets structure. The tailpieces needed little work to make sure of a good fit, as did the jets. The casting of the figure is superior – the 20mm tail cannon are not wispy threads of breakable metal but sturdily cast enabling very easy manipulation and handling during construction and painting.
The paint scheme is purely conjecture: the base is the standard RLM 76 but the darker swirls are RLM 73 Green. Just to be different, I tried new colors, supposing the Luftwaffe wanted a new color combination for the jet that planned to make the cross Atlantic flight. The plane was a breeze to paint up in the camouflage colors though it made painting the dark lines a little more of a challenge; tilting the model under a light made this easier. I was very pleased with the final result of both the constructed plane and final painted model.One last note on insignia: I used to be an obsessive-compulsive painter, PAINTING the insignia on each plane. I was reluctant to use decals for unknown reasons. What a knucklehead! Decals speed up the finishing process considerably and are SO easy to do. A couple of tips when using decals that I have discovered are to gloss protect the plane first. It makes application of the decals so much easier especially the white Luftwaffe ones. These are particularly tempermental – make sure you have an extra, wet paintbrush around to help position/reposition them. Decal loss due to folding, breaking, etc is highest with these decals. Plus, they are printed on white or sky blue paper, making cutting them out a challenge (suggestion – can these be printed on a darker color, please?!) The USA decals went on without a hitch. Always do several planes at one time so that the first set of decals (the fuselage, for instance) can dry before attempting to place the second set and to avoid messing up the previously nicely placed decals. I always apply the decals in pairs – top wing, underside and fuselage – to allow better matching. I have a thin set of tweezers to help placement along with a wet, thin paintbrush to move the decal around (make sure there is water underneath the edges of the decal to assist moving.) Lastly, remember that the enemy of good is perfect – a really nice set of decals can get screwed up because you just wanted to tweak one to get it perfect!

Thursday, January 18, 2007

WWII AIRPLANES
Luftwaffe 1946

FW Ta-183 "Huckbein" (GE-052)
While the western Allies deploy only one new jet to their 1946 arsenal (and the Soviets none!), the Luftwaffe player is able to fly 4 different bomber jets and 8 fighter jets and rockets. Some are those that flew operationally in WWII while others were prototypes. The Huckbein or Huckebein (a cartoon raven that traditionally makes trouble for others) is one of the latter. Scheduled test flights in May/June 1945 were interrupted when the British army overran the Focke Wulf facilities.
These jets are definitely “cool” with their sweptback wings and tail; they almost have a MiG-like appearance. Like the L46 P-58 model the Huckbein is cast from a single piece of white metal. It has fewer detail lines (and was my first attempt at this technique) but do not mistake that for a lackluster model. These planes are elegant and my favorite of the group! Using Polly S and Model Master paints, I painted the planes in standard late war fighter colors of RLM 82/83 over 76; RLM 02 with 75 as a highlight were used to stipple the sides of the planes. Lining was a very quick and easy task.
Sold in packs of two, you get a rotte that is easy to prepare, fun to paint (you can really use your imagination when picking colors - a good enough reason to try these jets out), ready to play and look great. These is tons of info online including color drawings (http://www.luft46.com/) from three different artists displaying what they thought the Huckbein would look like in flight.

WWII AIRPLANES
Luftwaffe 1946
US P-58 "Chain Lightning" (US-055)
The rules, Luftwaffe 1946, are reviewed in issue #8 of the HMG magazine, start with the premise that, for many reasons, the war in Europe has been extended into 1946. This allows all the major powers to expand their air forces to include jets. The P-58 was intended to be an improvement of the P-38 with the same speed but with much better defenses and significantly up-gunned. The pilot’s cupola is much larger than the P-38 and includes forward and rear firing guns and crew areas. Due to maintenance headaches and the end of the war, only one prototype was constructed.
Cleanly cast from a single piece of white metal any flash is cut or filed away fairly easily: it is a little harder to hand drill (I have drilled THROUGH the bodies of too many planes with my electric Dremel!) This is offset by the strength and sturdiness of the plane model itself – the 5 extended guns are sturdy and resist bending or breaking with normal handling, a problem I have encountered with lead or more thinly cast models. This is accomplished without making the plane looking clunky or chunky and after painting silver it really looks great! I tried my hand at the painting guide provided by the rules and painted in the detail lines. I found this much easier and quicker than I had initially anticipated. Using a very thin Windsor and Newton brush, I painted these lines in from a jar in which I had thinned some black paint (just enough to make it thin without being watery or wash-like.) The results look outstanding and worth the time; even so, I seriously doubt I will be lining the almost 400 other planes I’ve got though!This is a very nice looking figure. I’ll definitely be looking to get a wingman for this plane at the next convention!
http://www.luftwaffe1946.com/

Saturday, January 13, 2007

IS THE WAR OVER?
Ha! Being a "White" at heart, I could not resist taking a photo of Vladimir with some newly finished Copplestone Castings.

RUSSIAN CIVIL WAR


LENIN CONVERSION
Dixon Old West WG95
Here is the final, finished figure of the Lenin conversion I started at the end of last year. I lightened the inner jacket (suitcoat) in order to make it a little more visible; the Payne's Gray was just too dark. Using some spare sheet styrene I built up the base to make it level with the figure's base (see earlier blogs for reference.) Then, using paper from a 3x5 card, I cut strips to simulate a wood floor, gluing it in place with white glue. Pretty simple, really. I protected him with Testor's Matt Spray and he's now ready to take on petty bourgois capitalists!

Wednesday, January 03, 2007

COPPLESTONE GANGSTERS
Available from RLBPS
Copplestone Castings offers a wide selection of historical miniatures. The figures presented for review here are “The Candy Kid’s Street Punks” (GNS) from their Gangsters line and made available to HMG by RLBPS, their US distributor. The gangsters come 4 to a pack; the 20mm bases are included in each pack. Each figure is 27mm tall from the base to their eyes. Like all of Copplestone’s figures (in my collection so far), they are well proportioned, clean and very nicely cast.
The gangsters in this set have a variety of weapons. One of the two painted figures is firing a shotgun from the hip. Hatless, with windswept hair, he is dressed in a suit and tie. The second is armed with a knife and knuckledusters. The figure wears his shirtsleeves rolled up, an open vest and a soft “newsboy cap”. There is a figure armed with a baseball bat and also wears a "newsboy cap" like the knife wielding tough. The suspenders holding up his trousers are easily seen from behind and are a nice touch. The last figure is advancing, firing an automatic handgun. Also wearing a suit like the other gun-toting figure, he dons a fedora.
I found the figures easy to clean, prep and paint. The “free” base that came with the figure was a nice bonus – the figures balanced well when set up in them. I think these figures will work very well with those from Dixon reviewed earlier this year. The final results were very nice and I was very pleased with how the figures looked. For other Copplestone figures please check out:
http://www.rlbps.com/
(main site – scroll down to find and click on “Copplestone” to find the entire line of figures)

MODERN RUSSIANS
Little Wars sells a wide variety of miniatures and one of the newest is Modern Russians (RRI-001) as a part of the Assault Group line of figures. These miniatures are crisply cast in white metal and need only a little cleaning with an X-Acto to prepare them for painting. They are very sturdy yet not bulky - the thin assault rifle barrels hold up well (mine survived a cross country drive and the grasp of my 17 month old!) While the tallest standing figure measures 25mm to his eyes, most figures are crouching or kneeling. Packaged in groups of 8, there is two of each figure. The figures are posed in several very aggressive action poses, are wearing hooded tops and what looks like body armor. The figures are armed with AK-74s, come with lots of ammo pouches, bags and sport soft, woolen caps.
These figures look great and are posed very realistically with clear, clean details that should make painting fun and a breeze. I have not had the time to paint any at this time but if they are anything like the Renaissance Poles and Cossacks that I have painted, will look very nice (please refer to the Assault Group reviews in the HMG magazine for reference) – when I do get them painted, I will add the photos here and update this review. You can find more at:
http://littlewars.net/
(main site - click on “Assault Group” to find Modern Russians)

RUSSIAN CIVIL WAR
A. Deryabin (translated)
These books, now permanently out of print in Russia, have been translated by Tom Hillman and are available through Gauntlet International. The books cover the Red, White, Nationalist and Interventionalist armies that participated in the struggle for control of Russia following WWI. They have been repackaged into spiral bound paperback form and are, arguably, the last word on the subject of the Russian Civil War. Each is at least 46 pages long, with 8 color plates and many period black and white photos. The entire presentation is very similar to the Osprey series with one major departure – the text explaining the drawing is opposite the actual color plate for ease of reference.
The White book covers uniforms of the many “colorful” units of the period. There are descriptions of the units of named commanders (e.g. Kornilov, Alekseev, Markov, etc), shock units and cavalry units. The text also updates information found in the Osprey RCW White Army book. There are frequent references to plates in Osprey MAA books and this makes for a more complete study of the period.
The Red book presents information about uniforms, arms and organization during the RCW 1917-22. It covers the Red Army, Navy and Air Forces and their transition from the start to the finish of the war. The uniform plates show humble beginnings wearing modified Czarist uniforms to the ones usually associated with the Red Army of the period.
Considerable Nationalist movements began after the collapse of Czarist Russian and played a large role in the RCW. The book that discusses this describes armies and uniforms from such diverse areas such as the Baltic States, Byelorussia, Azerbaijan and Georgia. A large part of the book is devoted to the armies of the Ukraine, a complicated and involved subject. The book even describes Polish and Czechoslovak armies as they participated in the RCW.
A perhaps little know fact is the number of foreign countries that sent land troops to fight in Russia during the RCW. The intervention of the world’s major powers at the time may be more well known but forces from Italy, Greece, Rumania, Japan, China and Poland, to name a few, also sent soldiers to fight in this conflict (the newly re-born Polish state waged a war against the Bolsheviks, soundly defeating them in 1920!)
These books are a definite must for anyone who is interested in wargaming this period. The books offer a very complete study reference for the RCW. When combining the AST books with the Osprey books, the wargamer will have an outstanding painting reference for this turbulent and interesting period.
Two new books from the AST series are available, as well: White Armies of Northwest Russia and The White Army of North Russia. Many more books (and a brand new section devoted to printable RCW flags!) about this period can be found at:
http://www.gauntletinternational.com/

RUSSIAN CIVIL WAR
Osprey Publishing
(The Russian Civil War (1) The Red Army (MAA 293), The Russian Civil War (2) White Armies (MAA 305) and The Russian Army 1914-18 (MAA 364)
Each of these books is 48 pages with 8 color plates and multiple black and white photos. While the two Russian Civil War books offer information about specific units of the Red and White armies, The Russian Army 1914-18 is an essential third text to the uniforms worn by armies on both sides of the Russian Civil War. For example, in attempting to reference the type of uniforms/clothing worn by Siberian troops readers will find information in the Russian Army book alone (and it helped me to successfully paint my own figures!) Each book is a wealth of information essential to anyone interested in the RCW from Murmansk to the Ukraine and Crimea to Siberia and the Far East. The Red Army discusses Soviet unit organizations and briefly touches on weaponry; the majority of the text discusses uniforms and clothing. The Whites briefly discusses uniforms (though more is covered in the text describing the plates) and has more pages devoted to the descriptions of the different fronts that faced the Red Hordes. The Russian Army is a good all around text, spending equal pages discussing chronology, army organization, elite units, non-Russian units, uniforms, weapons and tactics.
What is most striking about all of these books is the evolution of the skill of the artist Andrei Karachtchouk. His drawings in the first (Red Army) is good and those in the next (Whites) is great and more animated/realistically posed (you can see some of the self confidence in some of pictures of the "colorful" White officers.) In the Russian Army, he has really outdone himself and I was most impressed with the drawings that rival my favorite Osprey artist Angus McBride.
These books are an essential part of anyone's Russian Civil War library.
http://www.ospreypublishing.com/

Monday, January 01, 2007

VALLEJO PAINTS
Vallejo makes several lines of paint suitable for miniatures. I use the Miniature and Model Colors line for the miniatures reviewed in the HMG magazine and on line for several reasons. Vallejo paints are easy to find and the color shades remain consistent from one batch to the next. The variety of colors available allow gamers to find just the right shade needed whether he is painting Spartans, Crusaders, the Age of Reason, Napoleonics, American Civil War or World War Two (and later!) The line of paints is commonly used and recommended by several online sites like on the Resistant Roosters, Battlefront and Cool Mini or Not websites (the last offers a great guide to painting ethnic skin tones.) I have found that the colors they suggest for 15mm figures works just as well for the 25mm scale.
Vallejo paints offer a dropper top dispensing method that is very helpful when mixing paints. For those who think this may be wasteful esp. for small projects, it is not. One neat thing that happens with Vallejo paints are shaken in preparation for use is that a very small amount is available at the dropper tip when the top is removed but before it is turned over. A small bubble can be expressed by squeezing the upright bottle – this is just the right amount of paint for touchups or for taking a bit for blending.
One of the big advantages is availability. I am a paint ho and have tons of bottles of old Polly S, Ral Partha, Armoury and other types of paints. Many of these are not made any longer or have changed (the old Polly S Field Grey was awesome but the new style is too green for me.) I have got them (I am a pack rat as well) and occasionally use them. It would be disastrous for me to show figures painted with them as no one can get them anymore – Vallejo paints are easy to find and offer a wide range of military colors and shades!
One suggestion when using Vallejo paints – when using them for the first time or after having not used them for a while, you need to really shake them up well, more than you might for other paints. If you get air bubbles or thin shades of paint, you need to shake the paint bottle more. You will find the colors will go on much better if you do this. Another thing I like to do is to paint a small square of color out onto a set of master sheets of paper (see the photo above.) It mkes it easier for me to compare and pick colors as the shade seen through the bottle is never as good as the painted shade itself. And while talking about colors, there are several shades that fall into my “gotta have ‘em” category including the Pale Blue Grey 907 that works great as a base for painting the difficult shade of white and Carmine Red 908, one of the best shades of red I have seen.
http://www.acrylicosvallejo.com/