 WWII AIRPLANES
Luftwaffe 1946
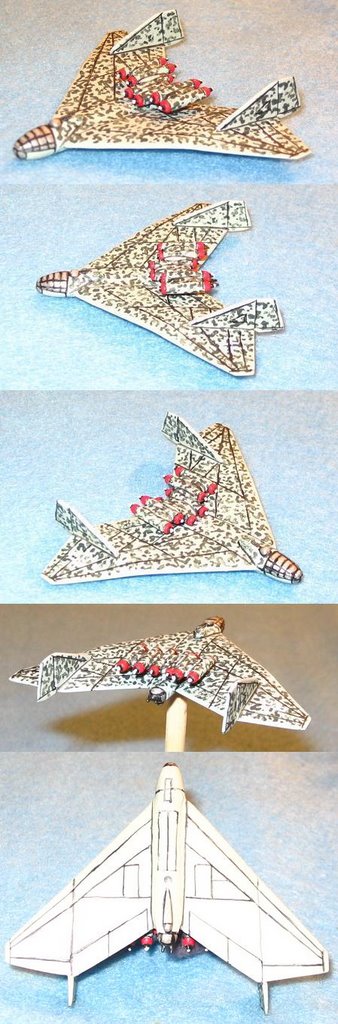
Arado 555-1 Amerika Bomber (GE-055)
In early 1944 Arado was asked to design a long-range jet bomber with the following requirements: high speed, a bomb load of at least 4000 kg (8818 lbs) and a range of 5000 km (3107 miles). The flying wing design seemed to offer the best opportunity to fulfill the design specs powered by six jet engines. The defensive armament included two 30mm cannon in the wing roots near the cockpit, a remote controlled turret armed with two 20mm cannon located just behind the cockpit and a further two 20mm cannon in a remote controlled tail turret. In December 1944, Arado was ordered to cease all work on the bomber and to concentrate aircraft development and production of fighters, likely due to the worsening air war over the Reich. In the Luftwaffe 1946 storyline, this is the plane that delivers a nuclear device to New Your City (again, plausible, as the distance from Paris to New York is about 3600 miles!)
This model comes in 4 different pieces – the fuselage/wings, the 2 vertical tail sections and the 6 dorsal jets structure. The tailpieces needed little work to make sure of a good fit, as did the jets. The casting of the figure is superior – the 20mm tail cannon are not wispy threads of breakable metal but sturdily cast enabling very easy manipulation and handling during construction and painting.
The paint scheme is purely conjecture: the base is the standard RLM 76 but the darker swirls are RLM 73 Green. Just to be different, I tried new colors, supposing the Luftwaffe wanted a new color combination for the jet that planned to make the cross Atlantic flight. The plane was a breeze to paint up in the camouflage colors though it made painting the dark lines a little more of a challenge; tilting the model under a light made this easier. I was very pleased with the final result of both the constructed plane and final painted model.One last note on insignia: I used to be an obsessive-compulsive painter, PAINTING the insignia on each plane. I was reluctant to use decals for unknown reasons. What a knucklehead! Decals speed up the finishing process considerably and are SO easy to do. A couple of tips when using decals that I have discovered are to gloss protect the plane first. It makes application of the decals so much easier especially the white Luftwaffe ones. These are particularly tempermental – make sure you have an extra, wet paintbrush around to help position/reposition them. Decal loss due to folding, breaking, etc is highest with these decals. Plus, they are printed on white or sky blue paper, making cutting them out a challenge (suggestion – can these be printed on a darker color, please?!) The USA decals went on without a hitch. Always do several planes at one time so that the first set of decals (the fuselage, for instance) can dry before attempting to place the second set and to avoid messing up the previously nicely placed decals. I always apply the decals in pairs – top wing, underside and fuselage – to allow better matching. I have a thin set of tweezers to help placement along with a wet, thin paintbrush to move the decal around (make sure there is water underneath the edges of the decal to assist moving.) Lastly, remember that the enemy of good is perfect – a really nice set of decals can get screwed up because you just wanted to tweak one to get it perfect!
posted by Michael @ 11:16 PM
0 comments
![]()

0 Comments:
Post a Comment
<< Home